现代的单页应用开发已经离不开 Webpack 类打包工具的帮助。本文将以 Webpack 1 为例解析 Javascript bundler 的工作原理,包括 code splitting。
注:
原始链接: https://www.404forest.com/2017/10/16/modern-web-development-tech-analysis-javascript-bundler/
文章备份: https://github.com/jin5354/404forest/issues/66
1. 分析 bundle.js
我们创建一个最小化的 bundle 示例,查看打包产物是什么样子:
entry.js
1 2 3 4 5
| const a = require('./a.js') const b = require('./b.js') a() b()
|
a.js
1 2 3 4 5
| function a() { console.log('module a function') } module.exports = a
|
b.js
1 2 3 4 5 6 7 8
| const c = require('./c.js') function b() { c() console.log('module b function') } module.exports = b
|
c.js
1 2 3 4 5
| function c() { console.log('module c function') } module.exports = c
|
共 4 个模块,entry、a、b、c,entry.js 为入口。打包后:
bundle.js
1 2 3 4 5 6 7 8 9 10 11 12 13 14 15 16 17 18 19 20 21 22 23 24 25 26 27 28 29 30 31 32 33 34 35 36 37 38 39 40 41 42 43 44 45 46 47 48 49 50 51 52 53 54 55 56 57 58 59 60 61 62
| (function(modules) { const installedModules = {} function require(moduleId) { if(installedModules[moduleId]) { return installedModules[moduleId].exports } const module = installedModules[moduleId] = { exports: {} } modules[moduleId](module, module.exports, require) return module.exports } return require(0) })({ 0: function(module, exports, require) { const a = require(1) const b = require(2) a() b() }, 1: function(module, exports, require) { function a() { console.log('module a function') } module.exports = a }, 2: function(module, exports, require) { const c = require(3) function b() { c() console.log('module b function') } module.exports = b }, 3: function(module, exports, require) { function c() { console.log('module c function') } module.exports = c }, })
|
执行该文件,会正常输出:
1 2 3
| module a function module c function module b function
|
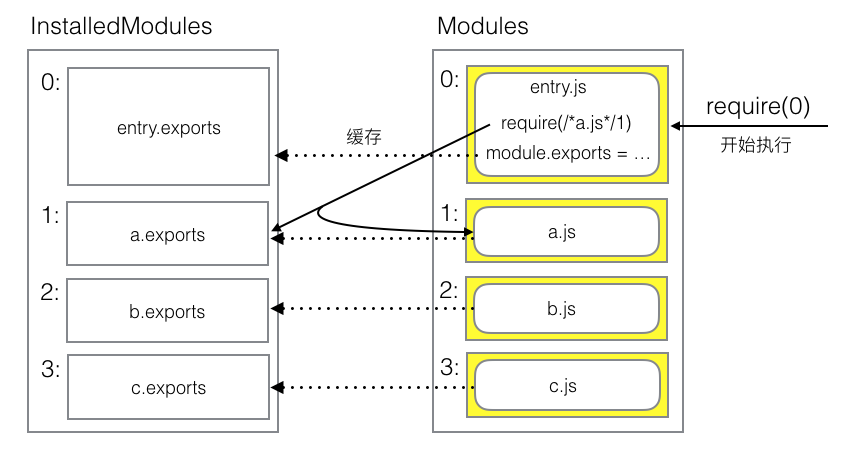
分析 bundle 可知:
- bundle 为自执行函数,函数接收一个参数:modules
- modules 是 object, entry、a、b、c 等所有用到的模块包裹为一个函数。模块中所需的变量
module, require 将由参数传入。模块函数以编号为 key 按顺序挂在其下面。
- 所有模块内部的 require 函数的参数由相对路径被替换成了模块编号
- 定义了 require 函数,接收模块编号作为参数。当执行 require 时先寻找 installedModules[模块编号] 是否存在,若不存在,则执行被 require 的模块函数,并将 module.exports 值挂在 installedModules[模块编号] 上。
- 由上条可知 installedModules 为缓存,这样在多次 require 同一个模块时不必多次执行该模块函数。
- 自执行函数中通过 require(0) 执行入口js,启动程序
简单画一个示例图:
2. 实现基本的 bundle 功能
可参考 leaf-bundler 的在这个 commit 时的代码。
2.1 读取 config
bundler 是命令行程序,我们一般这样用:
1
| $ bundler --config example/example1/bundler.config.js
|
bundler.config.js
1 2 3 4 5 6
| module.exports = { entry: './entry.js', output: { filename: 'bundle.js' } }
|
命令行的支持通过 commander 或同类模块可以轻松实现。获得 config 文件的相对路径后,直接 require(path.resolve(configPath)) 即可拿到 config 文件的内容。此处不赘述,可参考 bin/leaf-bundler 相关代码。
2.2 依赖收集
依赖收集是 bundle 过程中最关键的一环。我们需要从 entry 开始遍历分析每个模块,收集所有依赖的文件路径等信息,构造出一棵依赖树。
如何从模块中收集依赖?使用正则表达式可以匹配出代码中包含 require 的部分,但正则一是难以过滤注释中的代码,二是难以分析复杂的 require 表达式(如 require('a' + 'b')())。对于分析代码含义的需求,最恰当的是使用 Javascript Parse 工具,如 esprima。
调用 esprima 分析如下代码,会产生一个语法树:
1 2
| const a = require('./a.js') a()
|
1 2 3 4 5 6 7 8 9 10 11 12 13 14 15 16 17 18 19 20 21 22 23 24 25 26 27 28 29 30 31 32 33 34 35 36 37 38 39 40 41 42 43 44
| { "type": "Program", "body": [ { "type": "VariableDeclaration", "declarations": [ { "type": "VariableDeclarator", "id": { "type": "Identifier", "name": "a" }, "init": { "type": "CallExpression", "callee": { "type": "Identifier", "name": "require" }, "arguments": [ { "type": "Literal", "value": "./a.js", "raw": "'./a.js'" } ] } } ], "kind": "const" }, { "type": "ExpressionStatement", "expression": { "type": "CallExpression", "callee": { "type": "Identifier", "name": "a" }, "arguments": [] } } ], "sourceType": "script" }
|
纵览一下这个 AST 语法树即可发现 esprima 将代码的全部语义都进行了提取。代码包括两句,第一句是变量声明(VariableDeclaration),第二句是表达式(ExpressionStatement);变量声明时,变量名为 a,赋值内容为函数表达式(CallExpression),函数名为 require,值为字面量(Literal)”./a.js”……
通过深度优先遍历这个 AST ,查找 require 相关表达式,我们就可以准确的识别出某一段代码中的依赖了。具体代码可见 parse.js。拿到依赖后,递归对依赖文件进行分析。
由于在之后的流程中需要将 require(‘./a.js’) 替换为模块代码 require(1),使用 esprima 时还需添加选项 {range: true},记录 require 的参数的具体位置。从入口文件开始进行依赖分析,随后通过递归,对依赖继续进行分析,直到收集全所有依赖。重点要收集到:模块的绝对路径名(可作为唯一标识符)、模块源码、模块ID、模块的依赖、依赖的绝对路径名、ID和其在源码中的位置。
对第一节的例子进行依赖收集,最终的依赖树如下所示:
1 2 3 4 5 6 7 8 9 10 11 12 13 14 15 16 17 18 19 20 21 22 23 24 25 26 27 28 29 30 31 32 33 34 35 36 37 38 39 40 41 42 43 44 45 46 47 48 49 50 51 52 53 54 55 56 57 58 59 60 61 62 63
| { "/Users/jin/playground/leaf-bundler/example/example1/entry.js": { "id": 0, "filename": "/Users/jin/playground/leaf-bundler/example/example1/entry.js", "name": "./entry.js", "requires": [ { "name": "./a.js", "filename": "/Users/jin/playground/leaf-bundler/example/example1/a.js", "nameRange": [ 18, 26 ], "id": 1 }, { "name": "./b.js", "filename": "/Users/jin/playground/leaf-bundler/example/example1/b.js", "nameRange": [ 46, 54 ], "id": 2 } ], "asyncs": [], "source": "const a = require('./a.js')\nconst b = require('./b.js')\n\na()\nb()\n" }, "/Users/jin/playground/leaf-bundler/example/example1/a.js": { "id": 1, "filename": "/Users/jin/playground/leaf-bundler/example/example1/a.js", "name": "./a.js", "requires": [], "asyncs": [], "source": "function a() {\n console.log('module a function')\n}\n\nmodule.exports = a\n" }, "/Users/jin/playground/leaf-bundler/example/example1/b.js": { "id": 2, "filename": "/Users/jin/playground/leaf-bundler/example/example1/b.js", "name": "./b.js", "requires": [ { "name": "./c.js", "filename": "/Users/jin/playground/leaf-bundler/example/example1/c.js", "nameRange": [ 18, 26 ], "id": 3 } ], "asyncs": [], "source": "const c = require('./c.js')\n\nfunction b() {\n c()\n console.log('module b function')\n}\n\nmodule.exports = b\n" }, "/Users/jin/playground/leaf-bundler/example/example1/c.js": { "id": 3, "filename": "/Users/jin/playground/leaf-bundler/example/example1/c.js", "name": "./c.js", "requires": [], "asyncs": [], "source": "function c() {\n console.log('c')\n}\n\nmodule.exports = c\n" } }
|
2.3 源码 require 替换
由于最终模块都以 ID 为 key 挂在一个对象上,我们需要将源码中的 require('./a.js') 改成 require(1) 来保证 require 的正常工作。在依赖收集阶段,我们已经拿到了每个模块中的 require 的参数的具体位置,只需对源码用 splice 进行替换即可。
特别要注意的是,如果一个模块代码中有多个 require,需要进行多次替换,必须要从后向前进行替换。从前进行替换会导致其后的 require 位置发生变动,依赖收集时提供的位置数值就不准确了。替换部分代码可见 writeSource.js。
以 entry.js 为例,替换前后如下所示:
1 2 3
| const a = require('./a.js') const b = require('./b.js') ...
|
1 2 3
| const a = require(1) const b = require(2) ...
|
2.4 拼装生成
拼装最终 bundle 就很简单了,参考第一节的示例进行拼装:
头部:
1 2 3 4 5 6 7 8 9 10 11 12 13 14
| (function(modules) { const installedModules = {} function require(moduleId) { if(installedModules[moduleId]) { return installedModules[moduleId].exports } const module = installedModules[moduleId] = { exports: {} } modules[moduleId](module, module.exports, require) return module.exports } return require(0) })({
|
循环注入模块:
1 2 3 4 5 6 7
| {{模块ID}}: function(module, exports, require) { {{模块内容}} },
|
尾部:
3. code splitting
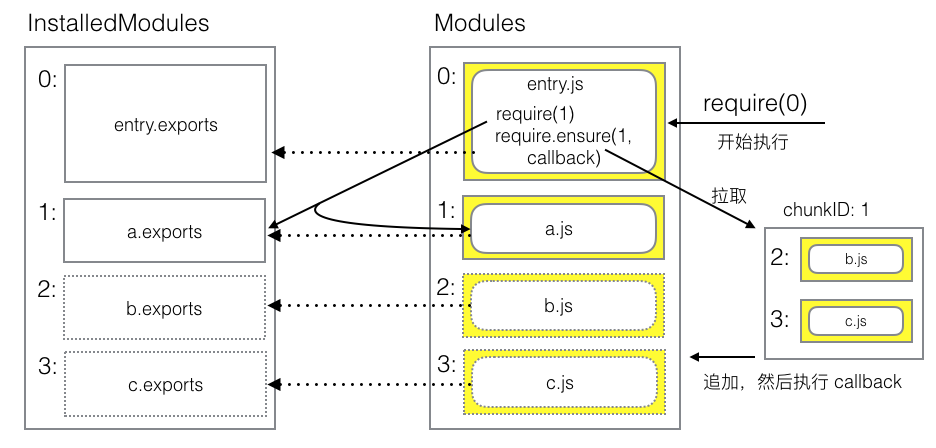
code splitting 将一个 bundle 切成了多个 chunk,且异步 chunk 为懒加载的——执行到 require.ensure 时才拉取并执行。为了实现这个功能,大体思路如下:
- 通过 require.ensure 标识新 chunk
- 依赖收集时,单独标识异步依赖
- 执行 require.ensure 时,拉取新 chunk
- 新 chunk 设计为一个 jsonp 函数,由
webpackJsonp 函数包裹
- 实现
webpackJsonp 函数,其会将新拉下来的 chunk 中的模块添加到主 modules 上,随后执行 require.ensure 的回调
code splitting 相关代码可参考这个 commit。
本节的例子会将 entry.js 中的依赖 b 改为异步依赖,其他不变。
entry.js
1 2 3 4 5 6 7
| const a = require('./a.js') a() require.ensure(['./b.js'], () => { const b = require('./b.js') b() })
|
3.1 单独收集异步依赖
单独收集 require.ensure 所标识的依赖,并为每个 chunk 赋予 ID。依然使用 esprima 解析出语法树,并对语法树进行递归遍历。对于模块中收集到的依赖,加入字段标识其是否为异步依赖。
1 2 3 4 5 6 7 8 9 10 11 12 13 14 15 16 17 18 19 20 21 22 23 24 25 26 27 28 29 30 31 32 33 34 35 36 37 38 39 40 41 42 43 44 45 46 47 48 49 50 51 52 53 54 55 56 57 58 59 60 61 62 63 64 65 66 67 68 69 70 71 72 73 74 75 76 77 78 79 80 81 82 83 84 85 86 87 88 89 90 91 92 93 94 95 96
| { "/Users/jin/playground/leaf-bundler/example/example2/entry.js": { "id": 0, "filename": "/Users/jin/playground/leaf-bundler/example/example2/entry.js", "name": "./entry.js", "requires": [ { "name": "./a.js", "filename": "/Users/jin/playground/leaf-bundler/example/example2/a.js", "nameRange": [ 18, 26 ], "async": false, "id": 1 }, { "name": "./b.js", "filename": "/Users/jin/playground/leaf-bundler/example/example2/b.js", "nameRange": [ 88, 96 ], "async": true, "id": 2 } ], "asyncs": [ { "requires": [ { "name": "./b.js", "filename": "/Users/jin/playground/leaf-bundler/example/example2/b.js" } ], "namesRange": [ 48, 58 ], "chunkId": 1, "chunks": [ 1 ] } ], "source": "const a = require('./a.js')\na()\n\nrequire.ensure(['./b.js'], () => {\n const b = require('./b.js')\n b()\n})\n\n", "chunkId": 0, "chunks": [ 0 ] }, "/Users/jin/playground/leaf-bundler/example/example2/a.js": { "id": 1, "filename": "/Users/jin/playground/leaf-bundler/example/example2/a.js", "name": "./a.js", "requires": [], "asyncs": [], "source": "function a() {\n console.log('module a function')\n}\n\nmodule.exports = a\n", "chunks": [ 0 ] }, "/Users/jin/playground/leaf-bundler/example/example2/b.js": { "id": 2, "filename": "/Users/jin/playground/leaf-bundler/example/example2/b.js", "name": "./b.js", "requires": [ { "name": "./c.js", "filename": "/Users/jin/playground/leaf-bundler/example/example2/c.js", "nameRange": [ 18, 26 ], "async": false, "id": 3 } ], "asyncs": [], "source": "const c = require('./c.js')\n\nfunction b() {\n c()\n console.log('module b function')\n}\n\nmodule.exports = b\n", "chunks": [ 1 ] }, "/Users/jin/playground/leaf-bundler/example/example2/c.js": { "id": 3, "filename": "/Users/jin/playground/leaf-bundler/example/example2/c.js", "name": "./c.js", "requires": [], "asyncs": [], "source": "function c() {\n console.log('c')\n}\n\nmodule.exports = c\n", "chunks": [ 1 ] } },
|
3.2 生成 chunk 索引
加入代码分割功能后,生成文件变为多个,每个 chunk 一个 js,需要在生成前根据依赖树进行梳理。具体代码可见 buildTree 部分。
整理后的 chunk 索引如下:
1 2 3 4 5 6 7 8 9 10 11 12 13 14 15 16 17 18 19
| "chunks": { "0": { "id": 0, "modules": { "0": "include", "1": "include" } }, "1": { "id": 1, "modules": { "2": "include", "3": "include" }, "parents": [ 0 ] } }
|
即最终有 2 个 chunk,第一个 chunk 内含 0、1 两个模块,第二个 chunk 内含 2、3 两个模块。
3.3 补充 require.ensure 和 webpackJsonp 函数
require.ensure 和 webpackJsonp 函数都将添加到最终产物的生成模板中。require.ensure 的主要功能是:根据 chunkID 拉取远程 chunk。webpackJsonp 函数的主要功能是:将拉取下来的 chunk 中的新模块添加到 modules 对象上,随后执行 require.ensure 的回调。
1 2 3 4 5 6 7 8 9 10 11 12 13 14 15 16 17 18 19 20 21 22 23
| ... require.ensure = function(chunkId, callback) { if(installedChunks[chunkId] === 1) return callback(require); if(installedChunks[chunkId] !== undefined) installedChunks[chunkId].push(callback) else { installedChunks[chunkId] = [callback] var head = document.getElementsByTagName('head')[0] var script = document.createElement('script') script.type = 'text/javascript' script.src = chunkId + '.chunk.js' head.appendChild(script) } }; window.webpackJsonp = function(chunkId, moreModules) { for(var moduleId in moreModules) modules[moduleId] = moreModules[moduleId] var callbacks = installedChunks[chunkId] installedChunks[chunkId] = 1 for(var i = 0; i < callbacks.length; i++) callbacks[i](require) } ...
|
3.4 拼装生成
根据 3.2 节的 chunk 索引,每一个 chunk 都要生成一个 js 文件。第一个 chunk 为自执行函数,添加了 require.ensure 和 webpackJsonp 两个工具函数,其他结构不变;其他 chunk 都是一个 webpackJsonp 函数。
webpackJsonp chunk 模板:
头部:
1 2
| webpackJsonp({{chunkID}}, {
|
循环注入所有模块:
1 2 3 4 5
| {{模块ID}}: function(module, exports, require) { {{模块代码}} },
|
尾部:
流程图:
4. 后记
webpack 的构建环节着实多,本想事无巨细的列出各部分代码,恐怕该文长度会大大膨胀,又无意将 webpack 拓展为系列,所以本文仅列出环节核心思路,不再逐个方法做示例。
loader 负责对各种类型的模块进行预处理,实质是一个字符串处理函数,输入字符串,输出字符串。require css 文件,或者图片这些在 commonJS 规范中不支持的操作,都是因为预先由 loader 将资源转换成 JS Module 才得以实现。例如 require css 文件的效果是将该段 css 包裹在 <style> 标签中打入 <head>:
实际会被 loader 转换为类似下文的结构:
1 2 3 4 5 6 7 8 9 10 11 12 13 14 15
| require(addStyle(style)) function addStyle(cssCode) { let styleElement = document.createElement('style') styleElement.type = 'text/css' if(styleElement.styleSheet) { styleElement.styleSheet.cssText = cssCode }else { styleElement.appendChild(document.createTextNode(cssCode)) } document.getElementsByTagName('head')[0].appendChild(styleElement) } style = `.test{font-size: 18px;}`
|
而 plugin 负责处理 loader 做不了的事情。webpack 内部有一套生命周期,plugin 可以在生命周期的各个环节拿到数据并进行处理。具体生命周期可参见 Compiler。
5.参考资料
- webpack源码学习系列之一:如何实现一个简单的webpack
- webpack源码学习系列之二:code-splitting(代码切割)
- webpack源码学习系列之三:loader 机制
- Writing a Plugin
- 细说 webpack 之流程篇